
Open-Source AI Cookbook documentation
怎么使用推理端点去嵌入文档

怎么使用推理端点去嵌入文档
作者: Derek Thomas
目标
我有一个数据集,我想为其嵌入语义搜索(或问答,或 RAG),我希望以最简单的方式嵌入这个数据集并将其放入一个新的数据集中。
方法
我将使用我最喜欢的 subreddit r/bestofredditorupdates 中的数据集。因为它有很长的条目,同时使用新的 jinaai/jina-embeddings-v2-base-en 嵌入模型,因为它有 8k 的上下文长度。还将使用 推理端点 部署这个,以节省时间和金钱。要跟随这个教程,你需要已经添加了支付方式。如果你还没有添加,可以在 账单 中添加。为了使操作更加简单,我将完全基于 API 进行操作。
为了使这个过程更快,我将使用 Text Embeddings Inference 镜像。这有许多好处,比如:
- 无需模型图编译步骤
- Docker 镜像小,启动时间快。真正的无服务器!
- 基于 token 的动态批处理
- 使用 Flash 注意力机制、Candle 和 cuBLASLt 优化的 transformers 代码进行推理
- Safetensors 权重加载
- 生产就绪(使用 Open Telemetry 进行分布式跟踪,Prometheus 指标)
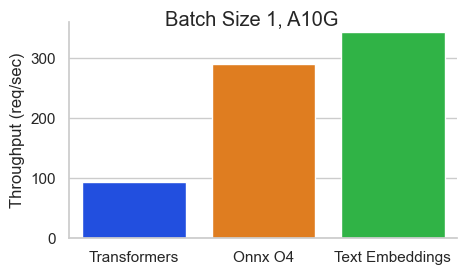
环境(Requirements)
!pip install -q aiohttp==3.8.3 datasets==2.14.6 pandas==1.5.3 requests==2.31.0 tqdm==4.66.1 huggingface-hub>=0.20导入包
import asyncio
from getpass import getpass
import json
from pathlib import Path
import time
from typing import Optional

from aiohttp import ClientSession, ClientTimeout
from datasets import load_dataset, Dataset, DatasetDict
from huggingface_hub import notebook_login, create_inference_endpoint, list_inference_endpoints, whoami
import numpy as np
import pandas as pd
import requests
from tqdm.auto import tqdm
设置(Config)
DATASET_IN 你文本数据的位置 DATASET_OUT 你的嵌入储存的位置
注意:我将 MAX_WORKERS 设置为 5,因为 jina-embeddings-v2 对内存的需求较大。
DATASET_IN = "derek-thomas/dataset-creator-reddit-bestofredditorupdates"
DATASET_OUT = "processed-subset-bestofredditorupdates"
ENDPOINT_NAME = "boru-jina-embeddings-demo-ie"

MAX_WORKERS = 5  # This is for how many async workers you want. Choose based on the model and hardware
ROW_COUNT = 100  # Choose None to use all rows, Im using 100 just for a demo
Hugging Face 在推理端点中提供了多种 GPU 供选择。下面以表格形式呈现:
| GPU | 实例类型 | 实例大小 | vRAM |
|---|---|---|---|
| 1x Nvidia Tesla T4 | g4dn.xlarge | small | 16GB |
| 4x Nvidia Tesla T4 | g4dn.12xlarge | large | 64GB |
| 1x Nvidia A10G | g5.2xlarge | medium | 24GB |
| 4x Nvidia A10G | g5.12xlarge | xxlarge | 96GB |
| 1x Nvidia A100* | p4de | xlarge | 80GB |
| 2x Nvidia A100* | p4de | 2xlarge | 160GB |
*注意,对于 A100 的机型你需要发邮件给我们来获取权限。
# GPU Choice
VENDOR = "aws"
REGION = "us-east-1"
INSTANCE_SIZE = "medium"
INSTANCE_TYPE = "g5.2xlarge"notebook_login()
有些用户可能会在组织中注册支付信息。这肯能会使你的支付方式链接组织。
如果你想使用你自己的用户名,请将其留空。
>>> who = whoami()
>>> organization = getpass(
...     prompt="What is your Hugging Face 🤗 username or organization? (with an added payment method)"
... )

>>> namespace = organization or who["name"]
What is your Hugging Face 🤗 username or organization? (with an added payment method) ········
获取数据
dataset = load_dataset(DATASET_IN)
dataset["train"]documents = dataset["train"].to_pandas().to_dict("records")[:ROW_COUNT]
len(documents), documents[0]推理端点
创建推理端点
我们将使用 API 来创建一个 推理端点。主要有以下几个好处:
- 方便(无需点击)
- 可重复(我们有代码可以轻松运行它)
- 更便宜(无需花费时间等待加载,并且可以自动关闭)
try:
    endpoint = create_inference_endpoint(
        ENDPOINT_NAME,
        repository="jinaai/jina-embeddings-v2-base-en",
        revision="7302ac470bed880590f9344bfeee32ff8722d0e5",
        task="sentence-embeddings",
        framework="pytorch",
        accelerator="gpu",
        instance_size=INSTANCE_SIZE,
        instance_type=INSTANCE_TYPE,
        region=REGION,
        vendor=VENDOR,
        namespace=namespace,
        custom_image={
            "health_route": "/health",
            "env": {
                "MAX_BATCH_TOKENS": str(MAX_WORKERS * 2048),
                "MAX_CONCURRENT_REQUESTS": "512",
                "MODEL_ID": "/repository",
            },
            "url": "ghcr.io/huggingface/text-embeddings-inference:0.5.0",
        },
        type="protected",
    )
except:
    endpoint = [ie for ie in list_inference_endpoints(namespace=namespace) if ie.name == ENDPOINT_NAME][0]
    print("Loaded endpoint")
这里有几个设计选择:
- 像之前所说,我们使用
jinaai/jina-embeddings-v2-base-en作为我们的模型。- 为了可复现性,我们将它固定到一个特定的修订版本。
- 如果你对更多模型感兴趣,可以查看支持列表。
- 请注意,大多数嵌入模型都是基于 BERT 架构的。
MAX_BATCH_TOKENS是根据我们的工作数量和嵌入模型的上下文窗口来选择的。type="protected"利用的是推理端点详细说明的安全功能。- 我使用 1x Nvidia A10,因为
jina-embeddings-v2对内存的需求很大(记住 8k 的上下文长度)。 - 如果你有高工作负载的需求,你应该考虑进一步调整
MAX_BATCH_TOKENS和MAX_CONCURRENT_REQUESTS。
等待直到它运行起来
>>> %%time
>>> endpoint.wait()
CPU times: user 48.1 ms, sys: 15.7 ms, total: 63.8 ms Wall time: 52.6 s
当我们使用 endpoint.client.post 时,我们得到一个字节字符串。这有点繁琐,因为我们需要将这个字节字符串转换为一个 np.array,但这只是 Python 中的几行快速代码。
response = endpoint.client.post(
    json={
        "inputs": "This sound track was beautiful! It paints the senery in your mind so well I would recomend it even to people who hate vid. game music!",
        "truncate": True,
    },
    task="feature-extraction",
)
response = np.array(json.loads(response.decode()))
response[0][:20]
你可能遇到超过上下文长度的输入。在这种情况下,需要你来处理它们。在我的情况下,我更愿意截断而不是出现错误。让我们测试一下这是否有效。
>>> embedding_input = "This input will get multiplied" * 10000
>>> print(f"The length of the embedding_input is: {len(embedding_input)}")
>>> response = endpoint.client.post(json={"inputs": embedding_input, "truncate": True}, task="feature-extraction")
>>> response = np.array(json.loads(response.decode()))
>>> response[0][:20]
The length of the embedding_input is: 300000
获取嵌入
在这里,我发送一个文档,用嵌入更新它,然后返回它。这是与 MAX_WORKERS 并行的发生的。
async def request(document, semaphore):
    # Semaphore guard
    async with semaphore:
        result = await endpoint.async_client.post(
            json={"inputs": document["content"], "truncate": True}, task="feature-extraction"
        )
        result = np.array(json.loads(result.decode()))
        document["embedding"] = result[0]  # Assuming the API's output can be directly assigned
        return document


async def main(documents):
    # Semaphore to limit concurrent requests. Adjust the number as needed.
    semaphore = asyncio.BoundedSemaphore(MAX_WORKERS)

    # Creating a list of tasks
    tasks = [request(document, semaphore) for document in documents]

    # Using tqdm to show progress. It's been integrated into the async loop.
    for f in tqdm(asyncio.as_completed(tasks), total=len(documents)):
await f>>> start = time.perf_counter()
>>> # Get embeddings
>>> await main(documents)
>>> # Make sure we got it all
>>> count = 0
>>> for document in documents:
... if "embedding" in document.keys() and len(document["embedding"]) == 768:
... count += 1
>>> print(f"Embeddings = {count} documents = {len(documents)}")
>>> # Print elapsed time
>>> elapsed_time = time.perf_counter() - start
>>> minutes, seconds = divmod(elapsed_time, 60)
>>> print(f"{int(minutes)} min {seconds:.2f} sec")Embeddings = 100 documents = 100 0 min 21.33 sec
暂停推理端点
现在我们已经完成了嵌入,让我们暂停端点,以免产生任何额外费用,同时这也允许我们分析成本。
>>> endpoint = endpoint.pause()

>>> print(f"Endpoint Status: {endpoint.status}")
Endpoint Status: paused
将更新后的数据集推送到 Hub
现在我们的文档已经更新了我们想要的嵌入。首先我们需要将其转换回 Dataset 格式。我发现从字典列表 -> pd.DataFrame -> Dataset 这条路径最为简单。
df = pd.DataFrame(documents)
dd = DatasetDict({"train": Dataset.from_pandas(df)})
我默认将其上传到用户的账户(而不是上传到组织),但你可以通过在 repo_id 中设置用户或在配置中通过设置 DATASET_OUT 来自由推送到任何你想要的地方。
dd.push_to_hub(repo_id=DATASET_OUT)
>>> print(f"Dataset is at https://huggingface.co/datasets/{who['name']}/{DATASET_OUT}")Dataset is at https://huggingface.co/datasets/derek-thomas/processed-subset-bestofredditorupdates
分析使用情况
- 前往下面打印的
dashboard_url - 点击使用与成本 (Usage & Cost) 标签
- 查看你已经花费了多少
>>> dashboard_url = f"https://ui.endpoints.huggingface.co/{namespace}/endpoints/{ENDPOINT_NAME}"
>>> print(dashboard_url)
https://ui.endpoints.huggingface.co/HF-test-lab/endpoints/boru-jina-embeddings-demo-ie
>>> input("Hit enter to continue with the notebook")Hit enter to continue with the notebook
我们可以看到只花了 $0.04 !
删除端点
现在我们已经完成了,不再需要我们的端点了。我们可以以编程方式删除端点。

>>> endpoint = endpoint.delete()

>>> if not endpoint:
...     print("Endpoint deleted successfully")
>>> else:
...     print("Delete Endpoint in manually")
Endpoint deleted successfullyUpdate on GitHub